缓冲区本质上是一块可以写入数据,然后可以从中读取数据的内存。这块内存被包装成NIO Buffer对象,并提供了一组方法,用来方便的访问该块内存。 由于ByteBuffer是非线程安全的,所以多线程访问的时候也必须加锁。
Buffer 的三个重要属性
- capacity(容量)
- position(位置)
- limit(限制)
position 和 limit 的含义取决于 Buffer 处在读模式还是写模式。不管 Buffer 处在什么模式,capacity 的含义总是一样的。
这里有一个关于 capacity,position 和 limit 在读写模式中的说明:
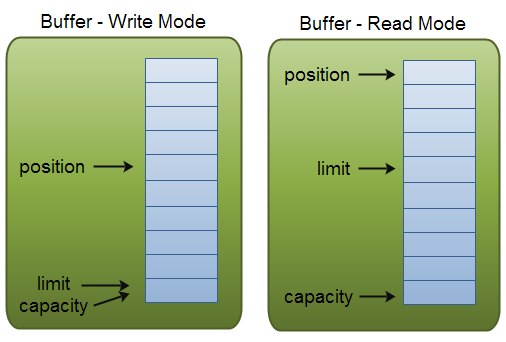
capacity(容量)
作为一个内存块,Buffer有一个固定的大小值,也叫“capacity”.你只能往里写capacity个byte、long,char等类型。一旦Buffer满了,需要将其清空(通过读数据或者清除数据)才能继续写数据往里写数据。
position(位置)
当你写数据到Buffer中时,position表示当前的位置。初始的position值为0.当一个byte、long等数据写到Buffer后, position会向前移动到下一个可插入数据的Buffer单元。position最大可为capacity – 1.
当读取数据时,也是从某个特定位置读。当将Buffer从写模式切换到读模式,position会被重置为0. 当从Buffer的position处读取数据时,position向前移动到下一个可读的位置。
limit(限制)
在写模式下,Buffer的limit表示你最多能往Buffer里写多少数据。 写模式下,limit等于Buffer的capacity。
当切换Buffer到读模式时, limit表示你最多能读到多少数据。因此,当切换Buffer到读模式时,limit会被设置成写模式下的position值。换句话说,你能读到之前写入的所有数据(limit被设置成已写数据的数量,这个值在写模式下就是position)
Buffer 类源码分析:
几个重要属性:
    // Invariants: mark <= position <= limit <= capacity
    private int mark = -1;
    private int position = 0;
    private int limit;
    private int capacity;

    // 在 direct buffers 中使用
    long address;
构造方法:
    // 构造函数,根据指定的参数来初始化Buffer特定的属性
    // 此构造函数是包私有的
    Buffer(int mark, int pos, int lim, int cap) {       // package-private
        if (cap < 0)
            throw new IllegalArgumentException("Negative capacity: " + cap);
        this.capacity = cap;
        limit(lim); // 设置 limit
        position(pos); // 设置 position
        if (mark >= 0) {
            if (mark > pos)
                throw new IllegalArgumentException("mark > position: ("
                                                   + mark + " > " + pos + ")");
            this.mark = mark;
        }
    }

    // 设置 position
    public final Buffer position(int newPosition) {
        if ((newPosition > limit) || (newPosition < 0))
            throw new IllegalArgumentException();
        position = newPosition;
        if (mark > position) mark = -1;
        return this;
    }

    // 设置 limit
    public final Buffer limit(int newLimit) {
        if ((newLimit > capacity) || (newLimit < 0))
            throw new IllegalArgumentException();
        limit = newLimit;
        if (position > limit) position = limit;
        if (mark > limit) mark = -1;
        return this;
    }
虽然 Buffer 类为抽象类不能实例化,但 Buffer 类有构造方法,供子类调用初始化自身属性。
Buffer 中常见的方法介绍
allocate()
要想获得一个 Buffer 对象首先要进行分配。 每一个 Buffer 子类都有一个 allocate 方法。
下面以 ByteBuffer 类为例:
ByteBuffer 也是一个抽象类,它的实现类有 HeapByteBuffer 和 DirectByteBuffer 两种。
- HeapByteBuffer:是在jvm虚拟机的堆上申请内存空间
- DirectByteBuffer:是直接在物理内存中申请内存空间
DirectByteBuffer 是在jvm堆外直接申请一块空间,其把文件映射到该内存空间中,与MappedByteBuffer较为类似,在特大文件的读写方面效率非常高。
    // ByteBuffer 继承了 Buffer 并声明了 allocate 方法
    public abstract class ByteBuffer extends Buffer implements Comparable<ByteBuffer> {

        final byte[] hb; // Non-null only for heap buffers  Buffer 类底层实现采用的是数组
        final int offset;
        boolean isReadOnly; // Valid only for heap buffers

        // ByteBuffer 构造方法,包访问权限,由于 ByteBuffer 是抽象类不能实例化,构造方法是供子类调用,并初始化自身属性。
        ByteBuffer(int mark, int pos, int lim, int cap,   // package-private
                     byte[] hb, int offset)
        {
            super(mark, pos, lim, cap);
            this.hb = hb;
            this.offset = offset;
        }

        // 堆上面的分配
        public static ByteBuffer allocate(int capacity) {
            if (capacity < 0)
                throw new IllegalArgumentException();
            return new HeapByteBuffer(capacity, capacity); // 实际返回的是 ByteBuffer 的子类 HeapByteBuffer,Java 多态的体现。
        }

        // 直接在物理内存上分配
        public static ByteBuffer allocateDirect(int capacity) {
            return new DirectByteBuffer(capacity);
        }
    }

    // HeapByteBuffer 类 为 ByteBuffer 实现类。调用 allocate 真正返回的为 HeapByteBuffer 对象。
    class HeapByteBuffer extends ByteBuffer {

        // 调用父类 ByteBuffer 构造方法,初始化 mark = -1, postion = 0, capacity = limit = 用户设定的容量。
        // 并初始化一个 capacity 大小的 byte 数组,所以 `Buffer 类底层实现采用的是数组数据结构。`
        HeapByteBuffer(int cap, int lim) {            // package-private
            super(-1, 0, lim, cap, new byte[cap], 0);
        }

    }
以上为调用 ByteBuffer.allocate(capacity) 的过程。
put()
用于向 Buffer 中添加元素,put 方法是在 HeapByteBuffer 中实现的,ByteBuffer byteBuffer = ByteBuffer.allocate(capacity) 中父类 byteBuffer 的引用指向的是 HeapByteBuffer 对象。
put 方法实际就是在当前 position 处存放值。然后 position 再自增。
    // 将值直接存放到当前 position 位置中
    public ByteBuffer put(byte x) {
        hb[ix(nextPutIndex())] = x;
        return this;
    }

    // nextPutIndex 方法是在 Buffer 中声明的, 该方法的作用是返回下一个存放数据的索引值,就是将当前的 position 返回,并自增。
    final int nextPutIndex() {  // package-private
        if (position >= limit)
            throw new BufferOverflowException();
        return position++; // 在自增之前返回当前 position 值。
    }

    // ix 方法作用就是偏移 offset 个位置
    // ix 方法在 HeapByteBuffer 中声明
    protected int ix(int i) {
        return i + offset;
    }
get()
读取 Buffer 中 position 位置的元素
    // 获取当前 position 位置数据。
    public int get() {
        return hb[ix(nextGetIndex())];
    }

    // 获取指定位置数据
    public int get(int i) {
        return hb[ix(checkIndex(i))];
    }

    // 返回当前 position 位置后,并自增,get 同 put 方法一样,调用后当前 position 都会自增。
    final int nextGetIndex() {                          // package-private
        if (position >= limit)
            throw new BufferUnderflowException();
        return position++;
    }

    // 检测输入的位置是否合法,小于0,或者大于等于 limit 值都会抛出异常。
    final int checkIndex(int i) {                       // package-private
        if ((i < 0) || (i >= limit))
            throw new IndexOutOfBoundsException();
        return i;
    }
flip()
将写模式转化为读模式
    // 将 limit 设置为当前 position 的值,position 重新赋为 0,如果 mark 被赋值也会被废弃。
    public final Buffer flip() {
        limit = position;
        position = 0;
        mark = -1;
        return this;
    }
hasRemaining()
判断Buffer中是否还有元素可读
    // 直接判断当前 position 是否小于 limit 的值。
    public final boolean hasRemaining() {
        return position < limit;
    }
clear()
清空 Buffer 中全部元素
    // clear 方法只是将几个属性全部重置,并没有将 Buffer 中数据清除。
    public final Buffer clear() {
        position = 0;
        limit = capacity;
        mark = -1;
        return this;
    }
compact()
将已读元素进行清除,未读元素拷贝保留并拷贝到 Buffer 最开始位置。这个也是和 clear() 方法不同的地方。
    // 先进行数组拷贝,将剩余的没有访问的元素拷贝到 Buffer 从零开始的位置
    public ByteBuffer compact() {
        System.arraycopy(hb, ix(position()), hb, ix(0), remaining());
        // 设置 position 为下一个写入元素的位置
        position(remaining());
        // 设置 limit 为 Buffer 容量
        limit(capacity());
        // 废弃 mark,即将 mark 设置为-1
        discardMark();
        return this;
    }
remaining()
仅在读模式下使用,用来获取还未读出的字节数。
    // 剩余的元素个数
    public final int remaining() {
        return limit - position;
    }
rewind()
从头读写数据或读数据
    //重置 position 为0,从头读写数据或读数据
    public final Buffer rewind() {
        position = 0;
        mark = -1;
        return this;
    }